Toolbox — For Training and Youth Work
All new tools in your inbox: Be the first to know about new tools for learning with our e-mail notifications.
Exercise
Animation
The history of the animation is longer than the history
of filmography. Animation brings stories to life. With animation, you can explain processes, products, services and ideas or create fictive stories. Animation is linear method of story-telling.
Aims of the tool
Animated stories are an effective way of storytelling,
more captivating for an audience than static visualisations.
Use it in order to get your message across in a
way you want it. From a Youth Work point of view, animation
can be helpful in explaining processes and services
and can also be used for promotional purposes.
Description of the tool
The structure of the methodology
Bring stories to life.
• Manuscripting the idea (creation of the
storyline, text and visual storyboard)
• Designing visual characters, objects and
scenes
• Recording the audio/voice over
• Animation – sequencing the movements
according to the manuscript
• Sound Effect timing
• Evaluation and editing of the animation
• Distribution through selected channels
Possible combinations
with other methodologies
Animation workshops can be combined with the following
methodologies:
• Manuscripting
• Visual storytelling, visualisation
• Digital storytelling: one minute movie
(editing and framing)
Animation is closely connected to visual storytelling,
one minute movie practices and visualization. These
methods employ some of the same tools.
The possible benefits of applying it to the
field of Youth Work
As visualisations, animations are useful when you
want to create capturing and engaging content. People
pay more attention to visual stories and their message
is understood better than just textual presentation.
Manuscripting the storyline also helps you to conceptualise
your story and learn how to present it in more
understandable way.
Youth workers can use the methodology for
• Explaining processes and services for the
stakeholders, decision makers, funders and
clients
• Promotional material for social media use
• Animation workshops for young people
Aspects to take into consideration when
using this approach in youth work
Animation helps youth workers bring their message
to different stakeholders and clients. Animated instructions
and other stories engage the audience when
distributed through social media channels.
Creating animations and engaging storyboards takes
a lot of time and it can be challenging to find enough
time for the creation. You also need equipment, software
and some graphical skills for the job.
Examples of the methodology being applied
in youth work, in different contexts
Animation made by Jarmo Röksä (author of this
chapter). The animation is based on an article by Susan
Cooper in which she describes the Transformative
Evaluation Model she developed. The process
is used to legitimate the value of youth work to the
stakeholders, decision makers and funders. The original
text is written in a complex academic style and
can be difficult for youth workers to understand. The
video seeks to introduce this great process to new audiences.
https://youtu.be/GJChoKMQCiw
This summer work and entrepreneurship campaign
by 4H and Humak aims to encourage youth to create
4H businesses. Made by Kari Keuru with an animation
application and with an image and character gallery.
https://youtu.be/-N_qiwuNlYs
Animation with powerpoint, version 2013 onwards
METHOD DESCRIPTION & HISTORY:
It has been always possible to create object animations
with PowerPoint. In versions 2013 onwards, the
tools have become very sophisticated, enabling you
to create very complex animations with the software.
This is not widely-known, however.
Animation enables us to bring engaging and original
stories to life.
INSTRUCTIONS
This is instructions on:
1. Story and manuscripting
2. Creation of characters and objects, visual
design or searching free-to-use images on the
Internet
3. Animating: Split the story into scenes and
assemble the full movie at the end of the
project in iPad.
4. Audio: Record the audio (can be done
before the point 3, making it easier to time the
scenes) and place them into the timeline in
iMovie
5. Show film and debrief: After the workshop,
the participants can discuss how they felt
during the exercise and discuss the animation
process (what went well, what could be better)
HOW TO APPLY IT FOR PEOPLE WITH DISABILITIES
OR FEWER OPPORTUNITIES
In practice everyone except visually-impaired people
can draw and one of the goals of the workshop is empower
people to realise this.
Bear in mind that ‘bring(ing) your own device’ may
not be possible for people with fewer opportunities.
When working with digital animation, ensure you
have a number of devices with you for participants
who may not have their own.
TIPS & TRICKS
Here is the animation process broken down into the
steps after the storyboarding is made. The finished
animation used for this example is available:
https://youtu.be/GJChoKMQCiw
Design characters and objects for the video (iPad Pro
and pencil or drawing pad) or use creative commons
licensed videos which are in png-format. Name images
so you can find them afterwards. Please note that
you can reuse the images in other animation projects.
Draw the movements, time and layout of the story on
the visual storyboard.
Use the 16:9 screen ratio. In creations meant for audiences
using mobile phones, you can also create
square or vertical scenes.
Create a separate scene/powerpoint-presentation for
each of the scenes. This makes the correction and rendering
process faster (formatting powerpoint to mp4
video).
Place the elements in the background furthest on the
scene. In fact, you operate in layers although they are
not visible in Powerpoint.
Build the scene and use the animation pane in order to
create the object’s movement. Keep it simple.
Creating a starting and endpoint for the object. Movement
from right to left with the stop in the front of
the building. This is done by dragging and dropping.
Adjusting the length on animation tools.
Static images become live with zooming and panning
movements.
If you do not have an editing programme in your PC,
upload scenes to the cloud or send them to your own
email in order to edit them in iPad.
Use an editing program such as iMovie to put the
scenes in the timeline in the correct order. Numbering
the screens (eg. scenes 01_description.mp4) helps a
lot.
Import audio files to the right scenes. You can record
the audio with your smartphone or with iPad.
If you want to lengthen or shorten the scene you can
adjust the length in iMovie
If you used Creative Common images, remember the
credits at the end of the video
Publish it in YouTube or other social media channels.
stop motion animation
METHOD DESCRIPTION & HISTORY:
The history of the animation is longer than the history
of filmography: Paleolithic cave paintings, magic
lanterns and the phenakistoscope were all used before
film was invented. After the introduction of film,
animations were part of early movies (as tricks and
background almost from the very beginning of the
era). Walt Disney’s 1937 Snow White and the Seven
Dwarfs was the first animated feature film completely
made using hand-drawn animation.
INSTRUCTIONS
Story and manuscripting
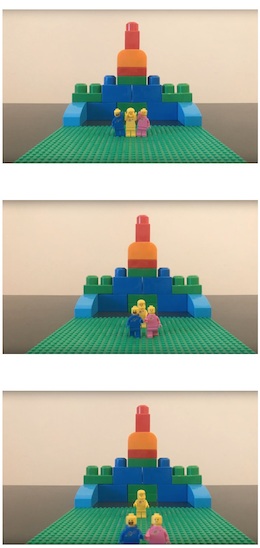
• Selection of characters/objects for the animation
(This can be practically anything: LEGO
blogs, fruit, office equipment, paper dolls etc.)
Animating
• Audio: Record the audio. This can be done
before the point 3, making it easier to time the
scenes. Place the audio into the timeline in
iMovie
• Show film and debrief: After the workshop,
the participants can discuss how they felt during
the exercise and discuss the animation process
(what went well, what could be better).
HOW TO APPLY IT FOR PEOPLE WITH
DISABILITIES OR FEWER OPPORTUNITIES
In practice everyone except visually impaired people
can draw and one of the goals of the workshop is empower
people to realise this.
Bear in mind that ‘bring(ing) your own device’ may
not be possible for people with fewer opportunities.
When implementing digital stop motion animation,
ensure you have a number of devices with you for
participants who may not have their own.
TIPS & TRICKS
In order to create this trick you need some basic
equipment such as a camera, an app and something to
animate. In our training, we use Lego figures, bricks,
fruits and sticks – anything that can be used to create
a motion.
You may use a semi-professional video camera with
features of interval recording or frame recording, but
a mobile phone or pad with a stop motion app can do
almost the same. There are several free stop motion
apps for iOS or Android e.g. Stop Motion Studio.
When using the app, first adjust the settings. The most
important setting is the frame rate - how many frames/
second the camera is shooting. More frames per second
means smoother movements in the final animation, but
it also means more animating work. The recommended
rate is usually at least 12 frames/second, since the resolution
of the eye is about this rate.
You will need something to hold your camera, mobile
phone or pad static. The perfect solution is a tripod,
but of course a homemade mobile phone holder is
also possible. Good lightning and the possibility to
adjust the lighting is also recommended.
INSTRUCTIONS FOR WORKSHOP
It is easier to organize the workshop if all participants
have access to the same app and the same system in
devices such as iPads; you can guide all participants
through the process. The workshop can start with a
short tutorial on the basics of shooting: how to handle
a camera, framing, image sizes, - angles, -movements,
lightning etc.
Limit the duration of the final animation to 20 - 30 sec.
That way, the length of workshop is round 2 hours.
When using Lego, it is also important to pay attention
to stability of the base and camera otherwise the final
video will be shaky. Be aware that all movements in
front of the lights will be visible as shadows in the final
video. Adjust all camera settings at the beginning
of filming.
Calmness, common sense and a good division of tasks
guarantee a good result. Every motion counts and it
is crucial to plan e.g. how many moves you need for
figures if one step takes half a second or one second.
It is also possible to animate one motion and then
multiply it or to use it backwards or reflect it as a mirror
image and remember that the final animation can
be assembled in parts.
The next phase is editing your stop motion animation.
Even though the app can render separate frames as
one video clip, we recommend editing the final video
individually. Sounds, filters, text and other effects can
be added and colours should be adjusted in this phase.
The final video can be uploaded to various platforms
to share it with a wider audience. Be sure to premiere
the film in some way; briefing and feedback are an
essential part of learning process.
Disclaimer
SALTO cannot be held responsible for the inappropriate use of these training tools. Always adapt training tools to your aims, context, target group and to your own skills! These tools have been used in a variety of formats and situations. Please notify SALTO should you know about the origin of or copyright on this tool.
Tool overview
http://toolbox.salto-youth.net/2734
This tool is for
All range of target groups: professional youth workers, communications people, young people. Please note that even people who can’t draw can create stunning animations by using copyright-free illustrations found on the internet.
and addresses
YOUTH in ACTION (YiA) programme
It is recommended for use in:
Strategic Partnerships
Materials needed:
Paper and pens for the sketching and manuscripting, PC with Powerpoint
2013 (minimum requirement), internet connection. An iPad Pro with pencil or a drawing
board makes it easier to draw your own characters. On iPads, iMovie can be used to put
the scenes together and attach the audio to the scenes.
Duration:
4 to 8 hours. The required time depends on the length and complexity of
the story. Preparation is time-consuming. It might be a good idea to ask participants to
bring their stories to the workshop. Designing the visuals also takes time. You can make
the time shorter by downloading a gallery of objects from the Internet (use transparent
PNG-images) for the workshop.
Behind the tool
The tool was created by
Jarmo Röksä and Kari Keuru
in the context of
FUTURE LABS - New Digital and Social Innovative Tools for Youth Work
The tool has been experimented in
2nd International training in Czech Republic
The tool was published to the Toolbox by
Kari Keuru (on 3 April 2020)
and last modified
21 January 2020
Comments
No comments have been posted yet.
If you want to comment on this tool, you need to be signed in with your MySALTO account. Sign in now